


Hey ladies and gents, Sherry here with another fab tutorial using the ever amazing Limor Webber Designs products!
For your convenience, I have linked up all the supplies at the bottom of this post.
Sometimes life gets crazy and events sneak up on us. Or does this only happen to me? I love to give handmade cards. For some reason, it gives me a little bit of pride when the recipient opens it and smiles! The effort put in, is totally worth that smile. However, shhhh don't tell, sometimes I have to whip it together quickly, because I realize **DEEP SIGN** I have no card as I'm preparing to leave! Can you relate? I'm sure we have all been there. Here is a quick technique for creating dramatic and beautiful cards in minutes, while they look like you spent days creating them!
Here is a view of today's finished card.

Now let's get started.
The focus of today's post is Magicals by Lindy's Stamp Gang. Oh I just love them, because each pot of color has multiple pigments that make them truly unique and well, "magical". For those of you unfamiliar with Magicals they are a highly pigmented permanent powders with shimmer. A small amount of pigment offers an INTENSE amount of color. They come in a variety of colors that also match Lindy's Starburst Stains. Magicals are different than other mica powders on the market, because of the unique color system developed by Lindy's Stamp Gang. The pigmented powders in Magicals are often variegated so it gives you unique results on every project. My favorite thing about magical powders is I have control over their concentration, since I'm controlling the pigment to water ratio.
You can use Magicals in many ways to achieve different looks. It is so fun to play with them. With today's technique, I will show you how to create an amazing 'tie dye' effect by just adding water to your project first. The results are STUNNING! Just like magic! Before we get started, I challenge you to pull out your Magicals and play along. This card is completely adaptable, and can be done in any color scheme that suits your fancy. If you don't have any Magicals on hand - HOLD ON TO YOUR WALLET - cause you are going to want them all after today's post!

I cut a 12"x12" sheet of watercolor paper to 6"x12" and scored at 6"
to create a folded 6"x6" card. You can have your card open from the
top or the side, but mine will open from the right side. For this
technique I opened my card (so I wouldn't get color on the back of the
card), as shown in Picture 1. In the bottom section (below the score
mark) spray the right and left margin with water. Try to avoid adding
too much water to the center of the card. Using a small fluffy clean
and dry brush pick up a few pieces of Magicals powder and tap them
onto your wet cardstock along the right and left edges.
You can see the pigments start to blend with the water as it bleeds out around your paper. TIP: If some powder sits in a small cluster, you can add a touch more water to encourage it to spread. Try to avoid adding too much water. Too much water will cause colors to run together and blend. As you can see, a small amount of powder packs a powerful punch! As it touches the water, you can see the multiple colors of pigments come to life creating our variegated 'Tea dye' effect. When these pigments are mixed with water and stirred, you don't notice the color combos that create the final color. This method helps each pigment color stand independently.


On the piece of watercolor paper that is left over from step 1, I sprayed a section with water and sprinkle my second color, Summer Lovin Sun, over the entire surface. Allow this to dry. I picked an area that I really liked the color tones and cut a 4.5"x6" section. Added bonus - you can save the left overs in your scraps for die-cutting or punching.

SUPPLIES:
Lindy’s Stamp Gang Magicals: T-bird Turquoise
Lindy’s Stamp Gang Magicals: Summer Lovin Sun
Embossing Powder: Bonjour Butter
IndigoBlu Limor Webber Designs: Industrial Lamps Stamp Set
IndigoBlu Limor Webber Designs: Ink Splats
IndigoBlu Flitter Kit
Strathmore: 12"x12" water color paper
OTHER SUPPLIES:
IndigoBlu MegaFlakes: Autumn Blaze, Chariot of Fire and Yorkshire Dales
Pop-dots
Small, fluffy brush
Black ink pad
You can see the pigments start to blend with the water as it bleeds out around your paper. TIP: If some powder sits in a small cluster, you can add a touch more water to encourage it to spread. Try to avoid adding too much water. Too much water will cause colors to run together and blend. As you can see, a small amount of powder packs a powerful punch! As it touches the water, you can see the multiple colors of pigments come to life creating our variegated 'Tea dye' effect. When these pigments are mixed with water and stirred, you don't notice the color combos that create the final color. This method helps each pigment color stand independently.

Allow this to dry completely. I set my cardstock aside to dry rather
than using a heat gun. If you chose to use a heat gun, note that the
air flow will move the pooled water around the card creating a pattern
as the cardstock dries. To avoid wasting product, I didn't add Magicals to the center of the card, as I knew that it would be covered
by my next pieces.

On the piece of watercolor paper that is left over from step 1, I sprayed a section with water and sprinkle my second color, Summer Lovin Sun, over the entire surface. Allow this to dry. I picked an area that I really liked the color tones and cut a 4.5"x6" section. Added bonus - you can save the left overs in your scraps for die-cutting or punching.

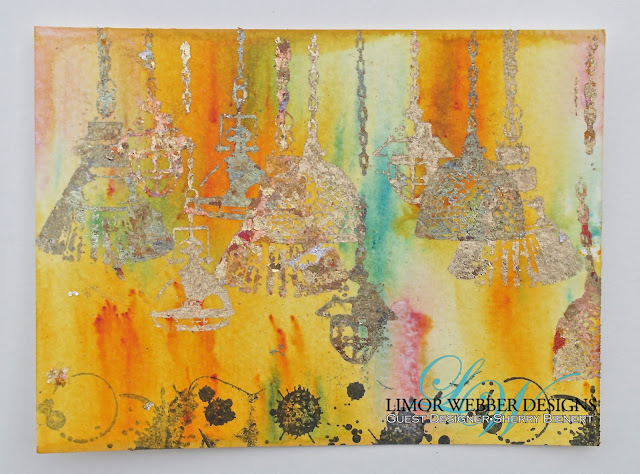
Foil accents are trending right now, so I decided to use my favorite
new tool kit, the FlitterGlu/MegaFlakes by IndigoBlu! This little baby
will give a stamped image a metallic finish in seconds. It is SUPER
simple to do, and the instructions are in the box. I chose Limor's new
'Industrial Lamp' stamp set that she designed for IndigoBlu to make
yummy metallic images on my card front! I wanted to use multiple
layers of lamps using a different colored MegaFlake Foil for every
layer. So before adding the glue to the stamp, I arranged them, image
side down, on the 4.5"x6" panel piece I made in the previous step.
Once in place, I place my acrylic block on top and pressed firmly to
insure that all stamps were on my blog in the proper location.
Following the instruction in the kit, I applied my first layer of
glue/ink to my card front. **NOTE: The kit ships with Winter Dawn
Foil, but I used other colors of Foil on my lamps to create an
interesting scene.** For the first stamp impression, I used Autumn
Blaze MegaFlakes. Once I burnished the image, I added my second stamp
impression, and used the Chariot of Fire MegaFlakes. The third time, I
used the Yorkshire Dales MegaFlakes. Using these three different
colors on my lamps gives them interest.
To add a bit of back for my sentiment I used Limor Webber Designs 'Ink
Splatters' stamp set and a black ink pad under my lamps.

To finish this little gem off, I used Lindy's embossing powder,
Bonjour Butter, from Limor's Tres Chic Collection. Using pop-dots, I
adhered this panel to the main base card that we made in the first
step. I centered it to cover the white areas. My card opens on the right.
Thank you so much for following along today! Hopefully you are
inspired to play around with Magicals. If you don't have any, I'm sure
you are itching to get your hands on them now - aren't you? For more
tutorials and inspiration head over to my blog for a peek! beautifulmess5891.wordpress.com
SUPPLIES:
Lindy’s Stamp Gang Magicals: T-bird Turquoise
Lindy’s Stamp Gang Magicals: Summer Lovin Sun
Embossing Powder: Bonjour Butter
IndigoBlu Limor Webber Designs: Industrial Lamps Stamp Set
IndigoBlu Limor Webber Designs: Ink Splats
IndigoBlu Flitter Kit
Strathmore: 12"x12" water color paper
OTHER SUPPLIES:
IndigoBlu MegaFlakes: Autumn Blaze, Chariot of Fire and Yorkshire Dales
Pop-dots
Small, fluffy brush
Black ink pad
Those industrial stamps are fantastic and you've incorporated them into your card perfectly. Loving your watercolor style xx
ReplyDelete